11 Temmuz 2012 Çarşamba
10 Temmuz 2012 Salı
9 Temmuz 2012 Pazartesi
bailey's & nutella cold coffee
To contact us Click HERE

If you know me then you know that I cannot be trusted around a jar of Nutella. My other two loves include Bailey's Irish Cream Liquor and coffee. So I decided to combine the three into my ultimate just-a-little-bit-naughty-treat which I should have posted on valentine's day when I actually made this ( just for me while T was at work!) but am remembering to post only now, coincidentally just in time for St. Patrick's day next weekend!
St. Paddy's day as it is now known , originated in Ireland and is also widely celebrated in the US. Now I am used to the multitudes of people dressed in bright green- a colour associated with St. Patrick along with shamrocks, the three-leaved plant that was used by St. Patrick to explain the Holy trinity- God the Father, Jesus and the Holy Spirit as One. (Yes I did just look up the significance of shamrocks on wikipedia.) Apparently it is also a day of celebration when the Lenten rules are lifted so most people make full use of that as an excuse to go get drunk silly! I am taking it as an excuse to indulge in some Bailey's nutella cold coffee.. yum!
This dreamy drink really doesn't need a recipe. I just spread some Nutella (you could also use melted chocolate. Melted white chocolate tinted green?) inside a champagne glass using a butter knife. Then I used a cotton bud to draw out a heart. You could draw a shamrock but that would be trickier. If you use a wider glass it should be easier.
And hey maybe you could even write stuff- just remember to write the letters reversed as they will be seen from the outside of the glass. If you mess up- no issues, just spread the chocolate and start over. This was just done for prettification. You being much saner than I, can just mix in the nutella with the coffee!
I then filled my pretty nutella glass with some coffee that I had made with milk but wished I had made with condensed milk instead ( Hot coffee + 1 teaspoon of condensed milk and then let to cool) and chilled in the fridge. Once chilled stir in a dash of Bailey's to the cold coffee. Stop here or add some toffee icecream.
Drink up, twirling the glass so that some of the nutella gets mixed with the milk. When you are done you have all that nutella to lick up with a spoon!
A very happy Holi to my Indian friends who celebrated it yesterday and happy Purim too! And for those who are just happy that the weekend is here- have a good one my friends!
Other Bailey's spiked treats:
Bailey's Macaron Mactails
Low Fat chocolate and Bailey's truffle mousse from Alice Medrich
Swan shaped puff with Bailey's maple mousse
Here's also a super easy no yeast no knead Beer Bread
And a bright green Spinach chicken curry that you can also make vegetarian by making it with paneer or chickpeas instead of the chicken Tweet
If you know me then you know that I cannot be trusted around a jar of Nutella. My other two loves include Bailey's Irish Cream Liquor and coffee. So I decided to combine the three into my ultimate just-a-little-bit-naughty-treat which I should have posted on valentine's day when I actually made this ( just for me while T was at work!) but am remembering to post only now, coincidentally just in time for St. Patrick's day next weekend!
St. Paddy's day as it is now known , originated in Ireland and is also widely celebrated in the US. Now I am used to the multitudes of people dressed in bright green- a colour associated with St. Patrick along with shamrocks, the three-leaved plant that was used by St. Patrick to explain the Holy trinity- God the Father, Jesus and the Holy Spirit as One. (Yes I did just look up the significance of shamrocks on wikipedia.) Apparently it is also a day of celebration when the Lenten rules are lifted so most people make full use of that as an excuse to go get drunk silly! I am taking it as an excuse to indulge in some Bailey's nutella cold coffee.. yum!
 |
| Oops! |
And hey maybe you could even write stuff- just remember to write the letters reversed as they will be seen from the outside of the glass. If you mess up- no issues, just spread the chocolate and start over. This was just done for prettification. You being much saner than I, can just mix in the nutella with the coffee!
I then filled my pretty nutella glass with some coffee that I had made with milk but wished I had made with condensed milk instead ( Hot coffee + 1 teaspoon of condensed milk and then let to cool) and chilled in the fridge. Once chilled stir in a dash of Bailey's to the cold coffee. Stop here or add some toffee icecream.
Drink up, twirling the glass so that some of the nutella gets mixed with the milk. When you are done you have all that nutella to lick up with a spoon!
A very happy Holi to my Indian friends who celebrated it yesterday and happy Purim too! And for those who are just happy that the weekend is here- have a good one my friends!
Other Bailey's spiked treats:
Bailey's Macaron Mactails
Low Fat chocolate and Bailey's truffle mousse from Alice Medrich
Swan shaped puff with Bailey's maple mousse
Here's also a super easy no yeast no knead Beer Bread
And a bright green Spinach chicken curry that you can also make vegetarian by making it with paneer or chickpeas instead of the chicken Tweet
Femina Women Awards
To contact us Click HERE
I have mentioned before that one of my favourite magazines growing up and even today is Femina. It introduced me to many inspiring women from all walks of life and when they contacted me to write a short note to you all about their L’Oreal Paris - Femina Women Awards in association with Rasvihar for the most admired and loved women in art, music, education, business, film and various other fields, I immediately agreed.
There are many women I admire especially in my world of food blogging. Their work, creativity and talent never ceases to inspire and motivate me. I am sure in many other fields there are many such terrific women who deserve attention and recognition for the incredible things they do and I look forward to meeting some of them through Femina.

The Logo and Trophy for the awards which will be held on the 22nd March, 2012 at the ITC Grand Central, Mumbai, have been inspired by the Tangram: a puzzle made of seven pieces of a square that can be rearranged in an endless array of forms celebrating the many and myriad facets of women with their tagline, ‘For All The Women You Are’.
Are there any women in your lives, your neighborhoods, your role models that you find inspiring? You can nominate people you admire by going to their face book page here for their reader's choice awards. Tweet
There are many women I admire especially in my world of food blogging. Their work, creativity and talent never ceases to inspire and motivate me. I am sure in many other fields there are many such terrific women who deserve attention and recognition for the incredible things they do and I look forward to meeting some of them through Femina.
The Logo and Trophy for the awards which will be held on the 22nd March, 2012 at the ITC Grand Central, Mumbai, have been inspired by the Tangram: a puzzle made of seven pieces of a square that can be rearranged in an endless array of forms celebrating the many and myriad facets of women with their tagline, ‘For All The Women You Are’.
Are there any women in your lives, your neighborhoods, your role models that you find inspiring? You can nominate people you admire by going to their face book page here for their reader's choice awards. Tweet
quick cooker carrot pal paysam and a girl's day out in the city!
To contact us Click HERE
Gosh has it been a long time since my last post! Where to begin. Well I started working with a non-profit. Even though it is only part-time and I get to work from home, it has been challenging managing deadlines and conference calls, what with having to report to a toddler as well, who we all know is the most demanding kind of boss!
While I have been cooking some and photographing a little, sadly blogging was put on the back burner. I wished for more hours in the day, but what I was really lacking was motivation.
And then last week, much needed motivation came in the form of my lovely friends and super talented fellow bloggers Vijitha, Prerna and Kankana. Along with two other new friends, Viji's Mom and our kids, we took a day off from our everyday routines to meet up in the city. We had been planning and discussing this for weeks. The night before we all made and packed snacks for the little ones, yummy beetroot parathas, ragi patties, chocolate loaf and some vattayappam from me ( recipe coming soon) I was so excited the night before I could hardly sleep, just like before long ago school excursions!
On the morning of our trip, I had a long call from work and all along I kept thinking of the bus I had to take to go meet the girls and if I missed it (which I did) I would have to wait an hour for the next one. Thankfully T came to the rescue dropping me off to the ferry landing so that I could take the ferry to San Francisco and I must say we traveled in style! My little monkey and I thoroughly enjoyed our ferry ride and I am so glad I ended up missing that bus.


If there is one thing that I learnt in life is that everything is much, much better shared with a gang of girl friends. Whether it be prawn pickle in a hostel mess or pre-exam panic, or a beautiful outing. I miss my girl friends and roommates from my college and hostel days a lot and was beginning to think I would never be able to enjoy that kind of female bonding again. I am so thankful to have met some good friends even after moving here and at this stage of my life as a mom, when I think I need friends most! We talked and laughed and munched, wandering through the market, pushing our strollers with our naughty toddlers along, while around us the city whirled and buzzed. Smartly suited professionals out for lunch waited patiently behind us as we discussed and debated what to order at the numerous little stalls within the ferry building.Young couples out on a date and nosy little pigeons edged out of the way of not one, not two, but four strollers and us large group of chattering women, brandishing our cameras and clicking away. We must have been quite a sight!
I only took my point and shoot along and left the photography to the experts, but then they decided they wouldn't let me eat my ice cream in peace and suddenly, my melting malted chocolate cone from Humphry Solocome was caught up in the middle of a full blown photo-shoot. I love that picture taken by Prerna and you can see Kankana and Viji's versions on their blog posts, beautifully capturing our magical day at the San Francisco Ferry building.
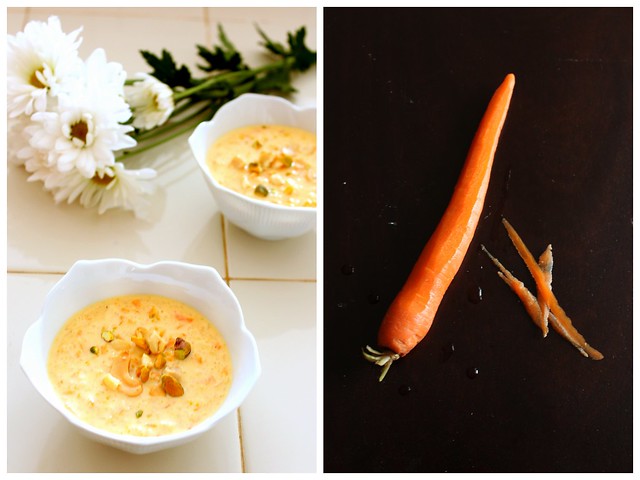
There was a farmers market happening that day and some of the girls bought gorgeous heirloom carrots to take home. Since they posted their carrot dishes as part of or impromptu group blogging activity to record our magical day out, I thought I too would blog about this super easy and very delicious cooker carrot pal payasam- a perfect spring time dessert!
Pal payasam is a sweet milk pudding that is commonly served in temples as prasadam in Kerala and most of South India. Phirni is a similar sweet dish, popular in North India which is served in clay pots which impart an earthy flavour and draw out the water, making the pudding thicker and creamier. While we add a handful of rice to give the sweet some body, it is not really a rice pudding, more of a milk pudding I think!. I used basmati rice although traditionally a special type of payasam rice called Unakalari is used in Kerala which imparts a pinkish colour to the pudding. You could use brown rice, but do not use glutinous or sticky Asian rice. This payasam is mainly sweetened milk which is slowly cooked, stirring for hours until it has reduced and tastes somewhat like condensed milk. Often it is made with creamy buffalo milk.
I made this in the pressure cooker, so it was super easy and quick, but you can also make this in a slow cooker or the traditional way-cooking it in a wide pot ( so that there is more surface area for the water in the milk to evaporate faster) until the milk has reduced to half it's original volume, though you have to watch that the milk at the bottom of the pan doesn't burn, so you have to stir it occasionally.
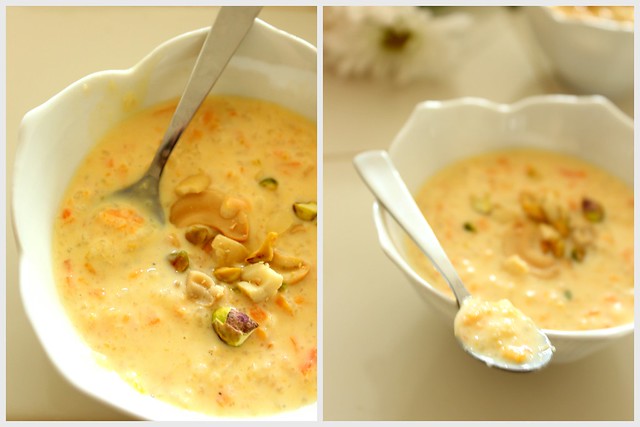
I added some grated carrot which melded very well, imparting their sweetness without overpowering the flavour of the milk which is the star. Sometimes a pinch of cardamom powder or saffron is used, and the pudding is usually garnished with chopped nuts, but I agree with purists that this is not necessary as you don't want anything distracting from the wonderful taste of the reduced milk.
4 Ingredient, quick and easy Carrot Pal Payasam
Ingredients:
Pulse the rice in a blender a few times to break it up. Do not grind it to a powder. (I skip this step if I'm in a hurry.)Wash the broken rice and let it drain in a strainerGrate the carrots using a box grater or food processorHeat the ghee or butter in a large pressure cooker or a heavy pot Add the carrots and cook, stirring until they no longer taste rawAdd the sugar and stir for a few minutes more until the sugar melts completelyNow add the rice and the milk and mix everything wellIf you are using a pressure cooker, put the lid and the whistle on. Cook on medium heat until one whistle.As soon as the whistle goes, switch the heat on to low for about 10 more minutes and then switch off the flame.(If you leave it on for too long, the pressure cooker may leak all over your kitchen so be careful!)Once you have switched off the heat, leave it on the stove until all the steam has gone.(Go do something else like paint your nails or read that blog post you had bookmarked!)Once all the steam has gone, open the pressure cooker and taste. If you want you can add more sugar now.
Stir the payasam occasionally on med-low flame (with the lid off) to thicken it more to your liking.
Serve warm or chilled ( I prefer it chilled as it gets a little thicker and creamier)Keeps well in a lidded container in the fridge for a few days. Make sure it has cooled before keeping in the fridge.
The taste of this payasam is rich and luxurious and I was craving it for days after it was all over. You might think that 1/4 cup of rice is not much but it really bulks up, absorbing the milk and you really don't want to add more. Even if you are a cardamom freak like me, and be tempted to add some or other spices- don't. Let the reduced milk flavor shine through!
I will be sending my carrot pal payasam to The Kerala Kitchen hosted by Jehanne of The Cooking Doctor this month Tweet
Gosh has it been a long time since my last post! Where to begin. Well I started working with a non-profit. Even though it is only part-time and I get to work from home, it has been challenging managing deadlines and conference calls, what with having to report to a toddler as well, who we all know is the most demanding kind of boss!
While I have been cooking some and photographing a little, sadly blogging was put on the back burner. I wished for more hours in the day, but what I was really lacking was motivation.
And then last week, much needed motivation came in the form of my lovely friends and super talented fellow bloggers Vijitha, Prerna and Kankana. Along with two other new friends, Viji's Mom and our kids, we took a day off from our everyday routines to meet up in the city. We had been planning and discussing this for weeks. The night before we all made and packed snacks for the little ones, yummy beetroot parathas, ragi patties, chocolate loaf and some vattayappam from me ( recipe coming soon) I was so excited the night before I could hardly sleep, just like before long ago school excursions!
On the morning of our trip, I had a long call from work and all along I kept thinking of the bus I had to take to go meet the girls and if I missed it (which I did) I would have to wait an hour for the next one. Thankfully T came to the rescue dropping me off to the ferry landing so that I could take the ferry to San Francisco and I must say we traveled in style! My little monkey and I thoroughly enjoyed our ferry ride and I am so glad I ended up missing that bus.
If there is one thing that I learnt in life is that everything is much, much better shared with a gang of girl friends. Whether it be prawn pickle in a hostel mess or pre-exam panic, or a beautiful outing. I miss my girl friends and roommates from my college and hostel days a lot and was beginning to think I would never be able to enjoy that kind of female bonding again. I am so thankful to have met some good friends even after moving here and at this stage of my life as a mom, when I think I need friends most! We talked and laughed and munched, wandering through the market, pushing our strollers with our naughty toddlers along, while around us the city whirled and buzzed. Smartly suited professionals out for lunch waited patiently behind us as we discussed and debated what to order at the numerous little stalls within the ferry building.Young couples out on a date and nosy little pigeons edged out of the way of not one, not two, but four strollers and us large group of chattering women, brandishing our cameras and clicking away. We must have been quite a sight!
I only took my point and shoot along and left the photography to the experts, but then they decided they wouldn't let me eat my ice cream in peace and suddenly, my melting malted chocolate cone from Humphry Solocome was caught up in the middle of a full blown photo-shoot. I love that picture taken by Prerna and you can see Kankana and Viji's versions on their blog posts, beautifully capturing our magical day at the San Francisco Ferry building.
There was a farmers market happening that day and some of the girls bought gorgeous heirloom carrots to take home. Since they posted their carrot dishes as part of or impromptu group blogging activity to record our magical day out, I thought I too would blog about this super easy and very delicious cooker carrot pal payasam- a perfect spring time dessert!
Pal payasam is a sweet milk pudding that is commonly served in temples as prasadam in Kerala and most of South India. Phirni is a similar sweet dish, popular in North India which is served in clay pots which impart an earthy flavour and draw out the water, making the pudding thicker and creamier. While we add a handful of rice to give the sweet some body, it is not really a rice pudding, more of a milk pudding I think!. I used basmati rice although traditionally a special type of payasam rice called Unakalari is used in Kerala which imparts a pinkish colour to the pudding. You could use brown rice, but do not use glutinous or sticky Asian rice. This payasam is mainly sweetened milk which is slowly cooked, stirring for hours until it has reduced and tastes somewhat like condensed milk. Often it is made with creamy buffalo milk.
I made this in the pressure cooker, so it was super easy and quick, but you can also make this in a slow cooker or the traditional way-cooking it in a wide pot ( so that there is more surface area for the water in the milk to evaporate faster) until the milk has reduced to half it's original volume, though you have to watch that the milk at the bottom of the pan doesn't burn, so you have to stir it occasionally.
I added some grated carrot which melded very well, imparting their sweetness without overpowering the flavour of the milk which is the star. Sometimes a pinch of cardamom powder or saffron is used, and the pudding is usually garnished with chopped nuts, but I agree with purists that this is not necessary as you don't want anything distracting from the wonderful taste of the reduced milk.
4 Ingredient, quick and easy Carrot Pal Payasam
Ingredients:
- Carrots 6 medium ( omit for traditional pal payasam)
- Kerala Rosematta or Basmati Rice 1/4 cup ( Not sticky or glutinous rice)
- Sugar 1/2 to 1 cup ( You can easily adjust sweetness depending on your preference, start with less and you can also add more sugar if needed at the end)
- Milk 4 cups ( I used whole milk)
- Ghee or butter 1 tbsp
- Chopped nuts for garnishing ( not necessary)
Pulse the rice in a blender a few times to break it up. Do not grind it to a powder. (I skip this step if I'm in a hurry.)Wash the broken rice and let it drain in a strainerGrate the carrots using a box grater or food processorHeat the ghee or butter in a large pressure cooker or a heavy pot Add the carrots and cook, stirring until they no longer taste rawAdd the sugar and stir for a few minutes more until the sugar melts completelyNow add the rice and the milk and mix everything wellIf you are using a pressure cooker, put the lid and the whistle on. Cook on medium heat until one whistle.As soon as the whistle goes, switch the heat on to low for about 10 more minutes and then switch off the flame.(If you leave it on for too long, the pressure cooker may leak all over your kitchen so be careful!)Once you have switched off the heat, leave it on the stove until all the steam has gone.(Go do something else like paint your nails or read that blog post you had bookmarked!)Once all the steam has gone, open the pressure cooker and taste. If you want you can add more sugar now.
Stir the payasam occasionally on med-low flame (with the lid off) to thicken it more to your liking.
Serve warm or chilled ( I prefer it chilled as it gets a little thicker and creamier)Keeps well in a lidded container in the fridge for a few days. Make sure it has cooled before keeping in the fridge.
The taste of this payasam is rich and luxurious and I was craving it for days after it was all over. You might think that 1/4 cup of rice is not much but it really bulks up, absorbing the milk and you really don't want to add more. Even if you are a cardamom freak like me, and be tempted to add some or other spices- don't. Let the reduced milk flavor shine through!
I will be sending my carrot pal payasam to The Kerala Kitchen hosted by Jehanne of The Cooking Doctor this month Tweet
easy and quick cashew chicken stir fry and a trip to china town
To contact us Click HERE
When we were kids, on Sunday after breakfast mom's kitchen was closed, and that was one day in the week she usually didn't cook. Sundays meant church, grocery shopping or trips to the zoo or the park, all of us watching the Mahabharata or Tipu Sultan on Door Darshan ( ah! those days before cable!) and the highlight being when dad would take us to our favourite neighbourhood eat out. Most often these were small hole in the wall kinds of places which I have learnt have some of the best food! Annapurna for crispy Dosas, the Shawarma stand at a nearby park, Moti Mahal for their yum butter chicken or to Golden Dragon, our neighbourhood Chinese restaurant where the food was in no way authentic to China but modified and spiced up to suit local tastes which is why I will only call it Asian inspired or Indo-Chinese.
Now that we live in the San Francisco Bay Area, I have the opportunity to taste and discover many kinds of cuisines and sample unusual dishes and ingredients - from fresh tofu straight from the bamboo molds to funky fermented things. But even today when I crave Chinese food what I usually mean is the familiar, Indo-Chinese dishes like sweet and sour pork, chilly chicken, gobi manchurian etc. that I grew up eating.
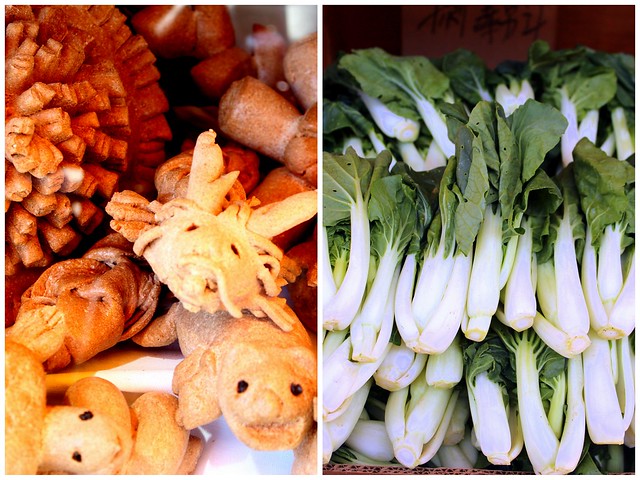
So when I recently wandered around the colourful and bustling San Francisco China Town where I guess I will taste the most authentic versions of Chinese Cuisine without actually taking a flight to China, I found the food ( apart from the dim sums which I LOVE) to be bland to my taste buds accustomed to the heavy dose of garlic and ginger and assaulted with spices. Although I am beginning to appreciate more subtleties and nuances in flavour, more often I like my flavours really bold!

Visiting China Town:
Walk! It's impossible to find parking here. Plus it's great to wander around and soak in the ambiance and especially interesting to visit during parades and festivals- though ofcourse would be much more crowded then.
My little one loved the stone lions outside the Chinese Benevolent Association building.
For knick knacks and props : The Far East Flea Market
and The Wok Shop for cast iron woks and other kitchen utensils
Keep an eye out for street art by the UK artist Banksy
I love going to China Town to pick up unusual ingredients and inexpensive little props for the blog. It's good to carry cash as some stores don't take cards.
It's also great fun to walk through the busy market and see weird things like dried sea urchin that I someday hope to find a way to use in my cooking! There are also lots of familiar things too, like this dried shrimp that made my Mallu mouth water.

China Town has very unique bakeries with impossibly fluffy sponge cakes and filled steamed cakes, and these cute shaped breads, that I spotted while I was traipsing down the busy markets, camera in one hand and my delicious bubble tea in the other. That was a good day!
When I got back home I was craving some of the kind of spicy Asian inspired stir frys that for me ( An Indian in the US) is quintessential Chinese food. I am very curious to hear suggestions for authentic and unique Chinese food I should try next time in China Town.
I usually make stir frys in my cast iron skillet to give the chicken a nice sear and a better alternative to deep frying. Garlic powder gives it that restaurant type taste, though I often add a lot of fresh garlic as well, being a household of garlic lovers! I toss in what ever vegetables I have on hand- broccoli, mushroom, peas, even a bag of frozen mixed veggies. That day it was bell peppers and onions and a handful of cashews for crunch! It may not be authentic, but it sure tastes good!

Easy Cashew Chicken Stir fry
Recipe heavily modified from one here
Ingredients:
2 large boneless skinless chicken breasts or chicken thigh fillets
For coating the chicken:
2 tablespoons cornstarch
2 tablespoons soy sauce ( Soy sauce is very salty so don't add any additional salt)
1/4 teaspoon pepper
1 teaspoon garlic powder ( optional)
For the stirfry:
1/4 cup cashews
3-4 cloves of garlic thinly sliced ( optional)
1 small yellow or white onion cut into cubes
3-4 thai green chillies slit in the middle (optional -adjust heat level or omit)
2 cups chopped vegetables ( I just used bell peppers, you can add mushroom, broccoli, peas, carrot slices, spring onion etc. can also use frozen mixed veggies)
For the sauce: ( Omit if you prefer it as a dry preparation)
1 cup chicken stock ( or 1 cup water and 1 cube chicken bouillon or even just 1 cup water. For a sweet and sour taste, substitute with orange juice, apple juice or prune juice )
1 tablespoon cornflour diluted in 1/4 cup water
1 tablespoon soy sauce
Directions:
Cut chicken into bite sized pieces and mix it well with soy sauce, garlic powder and the cornstarch to coat it
Refrigerate the coated chicken while you prep the veggies (For atleast 15 mins)
In a large, preferably cast iron skillet or wok, heat 2 tablespoons of oil and when it is hot, add the chicken
Wait till well browned on one side then flip over, brown on the other then keep stirring till the chicken is well cooked and no longer pink inside
Remove the chicken from the skillet and keep on a kitchen towel
In the same skillet, roast the cashews and add to the chicken.
Now heat another tablespoon of oil and stir fry the garlic and onion then the green chillies and other vegetables until cooked but still crisp to bite.
You can stop here if you just want a dry preparation, but I like to make some gravy or sauce to go with rice:
To the stir fried vegetables, add the chicken stock or water, the additional 1 tablespoon of soy sauce and 1 tablespoon of corn flour diluted in 1/4 cup water so that it is not lumpy
Heat everything until it starts to bubble then keep stirring so that it thickens and a sauce or gravy is formed.
Add the chicken at the last minute just before serving, so that it stays crispy
Add some green chilli vinegar sauce or sprinkle some chilli flakes for some zing and serve hot with rice or noodles.
Photography Exercise:
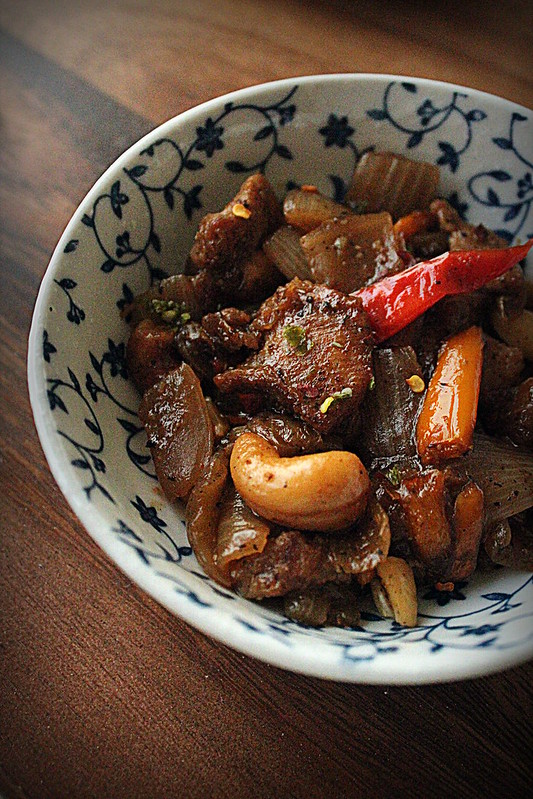
The first photograph was taken for Aparna's Less is more food photography exercise featuring a minimalistic theme with the use of only one or two props.
Props: I used a Chinese inspired rice bowl for the chicken stirfry
The background is a walnut wood lazy-susan
Camera: The photo was taken using my Canon T3i DSLR camera and kit lens. It was taken in manual mode
Editing: I also applied the hdr filter from picasa (for extra sharpness but this also gave a grainy effect.) and a vignette filter for the dark edges Tweet
 |
| Photo for "Less is More" Photography Exercise |
Now that we live in the San Francisco Bay Area, I have the opportunity to taste and discover many kinds of cuisines and sample unusual dishes and ingredients - from fresh tofu straight from the bamboo molds to funky fermented things. But even today when I crave Chinese food what I usually mean is the familiar, Indo-Chinese dishes like sweet and sour pork, chilly chicken, gobi manchurian etc. that I grew up eating.
So when I recently wandered around the colourful and bustling San Francisco China Town where I guess I will taste the most authentic versions of Chinese Cuisine without actually taking a flight to China, I found the food ( apart from the dim sums which I LOVE) to be bland to my taste buds accustomed to the heavy dose of garlic and ginger and assaulted with spices. Although I am beginning to appreciate more subtleties and nuances in flavour, more often I like my flavours really bold!
Visiting China Town:
Walk! It's impossible to find parking here. Plus it's great to wander around and soak in the ambiance and especially interesting to visit during parades and festivals- though ofcourse would be much more crowded then.
My little one loved the stone lions outside the Chinese Benevolent Association building.
For knick knacks and props : The Far East Flea Market
and The Wok Shop for cast iron woks and other kitchen utensils
Keep an eye out for street art by the UK artist Banksy
I love going to China Town to pick up unusual ingredients and inexpensive little props for the blog. It's good to carry cash as some stores don't take cards.
It's also great fun to walk through the busy market and see weird things like dried sea urchin that I someday hope to find a way to use in my cooking! There are also lots of familiar things too, like this dried shrimp that made my Mallu mouth water.
China Town has very unique bakeries with impossibly fluffy sponge cakes and filled steamed cakes, and these cute shaped breads, that I spotted while I was traipsing down the busy markets, camera in one hand and my delicious bubble tea in the other. That was a good day!
When I got back home I was craving some of the kind of spicy Asian inspired stir frys that for me ( An Indian in the US) is quintessential Chinese food. I am very curious to hear suggestions for authentic and unique Chinese food I should try next time in China Town.
I usually make stir frys in my cast iron skillet to give the chicken a nice sear and a better alternative to deep frying. Garlic powder gives it that restaurant type taste, though I often add a lot of fresh garlic as well, being a household of garlic lovers! I toss in what ever vegetables I have on hand- broccoli, mushroom, peas, even a bag of frozen mixed veggies. That day it was bell peppers and onions and a handful of cashews for crunch! It may not be authentic, but it sure tastes good!
Easy Cashew Chicken Stir fry
Recipe heavily modified from one here
Ingredients:
2 large boneless skinless chicken breasts or chicken thigh fillets
For coating the chicken:
2 tablespoons cornstarch
2 tablespoons soy sauce ( Soy sauce is very salty so don't add any additional salt)
1/4 teaspoon pepper
1 teaspoon garlic powder ( optional)
For the stirfry:
1/4 cup cashews
3-4 cloves of garlic thinly sliced ( optional)
1 small yellow or white onion cut into cubes
3-4 thai green chillies slit in the middle (optional -adjust heat level or omit)
2 cups chopped vegetables ( I just used bell peppers, you can add mushroom, broccoli, peas, carrot slices, spring onion etc. can also use frozen mixed veggies)
For the sauce: ( Omit if you prefer it as a dry preparation)
1 cup chicken stock ( or 1 cup water and 1 cube chicken bouillon or even just 1 cup water. For a sweet and sour taste, substitute with orange juice, apple juice or prune juice )
1 tablespoon cornflour diluted in 1/4 cup water
1 tablespoon soy sauce
Directions:
Cut chicken into bite sized pieces and mix it well with soy sauce, garlic powder and the cornstarch to coat it
Refrigerate the coated chicken while you prep the veggies (For atleast 15 mins)
In a large, preferably cast iron skillet or wok, heat 2 tablespoons of oil and when it is hot, add the chicken
Wait till well browned on one side then flip over, brown on the other then keep stirring till the chicken is well cooked and no longer pink inside
Remove the chicken from the skillet and keep on a kitchen towel
In the same skillet, roast the cashews and add to the chicken.
Now heat another tablespoon of oil and stir fry the garlic and onion then the green chillies and other vegetables until cooked but still crisp to bite.
You can stop here if you just want a dry preparation, but I like to make some gravy or sauce to go with rice:
To the stir fried vegetables, add the chicken stock or water, the additional 1 tablespoon of soy sauce and 1 tablespoon of corn flour diluted in 1/4 cup water so that it is not lumpy
Heat everything until it starts to bubble then keep stirring so that it thickens and a sauce or gravy is formed.
Add the chicken at the last minute just before serving, so that it stays crispy
Add some green chilli vinegar sauce or sprinkle some chilli flakes for some zing and serve hot with rice or noodles.
Photography Exercise:
The first photograph was taken for Aparna's Less is more food photography exercise featuring a minimalistic theme with the use of only one or two props.
Props: I used a Chinese inspired rice bowl for the chicken stirfry
The background is a walnut wood lazy-susan
Camera: The photo was taken using my Canon T3i DSLR camera and kit lens. It was taken in manual mode
Editing: I also applied the hdr filter from picasa (for extra sharpness but this also gave a grainy effect.) and a vignette filter for the dark edges Tweet
coffee cake with coffee swiss meringue buttercream for dads
To contact us Click HERE

Today being Father's day, I had planned to post this coffee high cake in honour of the two fathers in my life- T and my dad who both have a thing for coffee, and so I am assuming most other dads do too.
My Dad drinks his cuppa several times a day and although he is one of the most easy going people ever, he is very specific about the way his coffee should be made. Even today I don't seem to make it just the way he likes it -it has to be just hot enough, with just the right amount of milk and topped with the exact tiny amount of froth.. It's much easier to make macarons than Dad's cup of coffee!
T is thankfully not as particular but likes his espresso straight up- no milk no sugar- full strength.
I was thinking about a special Father's Day message to begin this coffee cake post with and was chopping some onions to make a quick brunch, with my little toddler/tiny kitchen helper running around looking through my cabinets for his "lello" crayon to put the finishing touches on his hand drawn card for T, when it happened to me...

If you watch Top Chef or any of those cooking shows ( as I do obsessively) everytime someone is chopping onions invariably they will cut their finger. It happens so often it's almost predictable. Kitchen accidents are very very common, and yes the kitchen, even a stress free kitchen like the one at home is a dangerous place. I don't mean to scare you but I was reminded of the fact today, perhaps so that I can be more careful and aware!
As I was chopping the onion, the peel slipped and I cut my finger. It was not very deep or anything, but there was some blood and since there are lots of nerve endings on the fingertips- quite some pain. Being the wuss that I am, I got lightheaded was sure I was going to faint, and could see that my little kitchen helper was getting worried. Thankfully just then T walked into the kitchen and in my half-faint I immediately knew it was all ok, and so did the little one who joyfully jumped into his arms. And that's what fathers do- they make you feel like everything will be ok.
(I did not faint, the feeling passed in about half an hour- apparently its just adrenalin rushing and my finger is fine, just a little sore and bandaged. )
Happy Father's Day to T, the little one's hero, to my own wonderful daddy who has always been there for me through my childhood and terrible, terrible door slamming teens ( I cringe) all these years and to all fathers everywhere! Today seems just as good a day as any, to say thank you for all that you do and for having been there for us.

The cake is a light sponge cake flavored with a coffee liqueur syrup that keeps the sponge cake moist and I frosted the cake with a Coffee Swiss Meringue Butter cream frosting which I was trying for the first time.
Swiss Meringue Buttercream is the frosting that most bakery cakes are made with, and commonly used for wedding and party cakes and usually used under fondant.This is because it is especially stable and will stay good and hold up for a longer time. It can even be made before hand and frozen! Yes frozen and then thawed in the fridge overnight before whipping it slightly on the day you plan to use it. Imagine the possibilities if you are the organized type: make a large batch of plain frosting and freeze in parts. When ready to use mix each part with different flavours and colours! (I don't think I can manage knowing about a large batch of frosting in the freezer- that might be quite dangerous- leading to baking of way too many cakes, just to frost them!)
Full disclosure : I think I now actually am more excited about baking cakes than eating them! And when I do eat cake, I actually prefer eating plain cakes like these. Once in a while I do get in the mood to eat a thin slice of layer cake with glorious frosting, though my favorite frosting ever is still this simple chocolate or nutella ganache, this cream cheese frosting and regular American buttercream. But because of it's long lasting nature I may consider Swiss Meringue Buttercream especially if I am making a party cake for many people and am worried about it holding up.
Ofcourse the reason behind me not liking the taste as much could be that I used salted butter when I made this because it was all I had, and have learnt my lesson. I will save my salted butter for my toast or salted caramels, NEVER use salted butter for frosting- it will taste way too salty!
My friends in India, that means no using (yummy) Amul butter here. Look for an unsalted version or brand.Am sure this would taste amazing made with home churned butter like my grandmother used to make back when she had cows and little crochet mesh covered jugs of fresh creamy milk.
Recipes used to make this Coffee Swiss Butter Cream Cake:
Frosting:
Swiss Meringue Buttercream from here. I just added 1/4 tsp of coffee powder, tasting and adding more if required while mixing. Do NOT use salted butter here! Though a tablespoon of Baileys or other coffee liqueur is totally acceptable :)
For a fantastic step by step tutorial on how to make Swiss Meringue Buttercream see this, but remember to brace yourself because Rosie is just an artist with her cakes and you may become bewitched!
Also a friend who is a fabulous baker gave me this tip about using about 1/4th less butter than called for in most recipes to have a lighter frosting without that slick texture that this one had. Must try that next time.
Cake:
I used the easy sponge cake from here and added some instant coffee powder to the batter.

But this would be equally good with my all time favourite chocolate cake here

Or my absolute favourite cake ever in the whole world, this fluffy and cloud-like whipped cream cake.

Actually Swiss Meringue Butter cream will go on anything and it is definitely worth learning for its versatility and stability and satiny smooth, fluffy texture.
For moistening the cake layers before filling and frosting: Use simple sugar syrup, a combination of equal parts sugar and water heated until the sugar is dissolved to which flavorings like vanilla or in this cake- coffee liqueur and 1/4 tsp instant coffee powder were used and brush it over the two cake layers to moisten and flavour them. IF you like cake really moist, you can poke holes all over the cake with toothpicks and pour the syrup over the cake with a spoon.Tweet
Today being Father's day, I had planned to post this coffee high cake in honour of the two fathers in my life- T and my dad who both have a thing for coffee, and so I am assuming most other dads do too.
My Dad drinks his cuppa several times a day and although he is one of the most easy going people ever, he is very specific about the way his coffee should be made. Even today I don't seem to make it just the way he likes it -it has to be just hot enough, with just the right amount of milk and topped with the exact tiny amount of froth.. It's much easier to make macarons than Dad's cup of coffee!
T is thankfully not as particular but likes his espresso straight up- no milk no sugar- full strength.
I was thinking about a special Father's Day message to begin this coffee cake post with and was chopping some onions to make a quick brunch, with my little toddler/tiny kitchen helper running around looking through my cabinets for his "lello" crayon to put the finishing touches on his hand drawn card for T, when it happened to me...
If you watch Top Chef or any of those cooking shows ( as I do obsessively) everytime someone is chopping onions invariably they will cut their finger. It happens so often it's almost predictable. Kitchen accidents are very very common, and yes the kitchen, even a stress free kitchen like the one at home is a dangerous place. I don't mean to scare you but I was reminded of the fact today, perhaps so that I can be more careful and aware!
As I was chopping the onion, the peel slipped and I cut my finger. It was not very deep or anything, but there was some blood and since there are lots of nerve endings on the fingertips- quite some pain. Being the wuss that I am, I got lightheaded was sure I was going to faint, and could see that my little kitchen helper was getting worried. Thankfully just then T walked into the kitchen and in my half-faint I immediately knew it was all ok, and so did the little one who joyfully jumped into his arms. And that's what fathers do- they make you feel like everything will be ok.
(I did not faint, the feeling passed in about half an hour- apparently its just adrenalin rushing and my finger is fine, just a little sore and bandaged. )
Happy Father's Day to T, the little one's hero, to my own wonderful daddy who has always been there for me through my childhood and terrible, terrible door slamming teens ( I cringe) all these years and to all fathers everywhere! Today seems just as good a day as any, to say thank you for all that you do and for having been there for us.
The cake is a light sponge cake flavored with a coffee liqueur syrup that keeps the sponge cake moist and I frosted the cake with a Coffee Swiss Meringue Butter cream frosting which I was trying for the first time.
Swiss Meringue Buttercream is the frosting that most bakery cakes are made with, and commonly used for wedding and party cakes and usually used under fondant.This is because it is especially stable and will stay good and hold up for a longer time. It can even be made before hand and frozen! Yes frozen and then thawed in the fridge overnight before whipping it slightly on the day you plan to use it. Imagine the possibilities if you are the organized type: make a large batch of plain frosting and freeze in parts. When ready to use mix each part with different flavours and colours! (I don't think I can manage knowing about a large batch of frosting in the freezer- that might be quite dangerous- leading to baking of way too many cakes, just to frost them!)
Full disclosure : I think I now actually am more excited about baking cakes than eating them! And when I do eat cake, I actually prefer eating plain cakes like these. Once in a while I do get in the mood to eat a thin slice of layer cake with glorious frosting, though my favorite frosting ever is still this simple chocolate or nutella ganache, this cream cheese frosting and regular American buttercream. But because of it's long lasting nature I may consider Swiss Meringue Buttercream especially if I am making a party cake for many people and am worried about it holding up.
Ofcourse the reason behind me not liking the taste as much could be that I used salted butter when I made this because it was all I had, and have learnt my lesson. I will save my salted butter for my toast or salted caramels, NEVER use salted butter for frosting- it will taste way too salty!
My friends in India, that means no using (yummy) Amul butter here. Look for an unsalted version or brand.Am sure this would taste amazing made with home churned butter like my grandmother used to make back when she had cows and little crochet mesh covered jugs of fresh creamy milk.
Recipes used to make this Coffee Swiss Butter Cream Cake:
Frosting:
Swiss Meringue Buttercream from here. I just added 1/4 tsp of coffee powder, tasting and adding more if required while mixing. Do NOT use salted butter here! Though a tablespoon of Baileys or other coffee liqueur is totally acceptable :)
For a fantastic step by step tutorial on how to make Swiss Meringue Buttercream see this, but remember to brace yourself because Rosie is just an artist with her cakes and you may become bewitched!
Also a friend who is a fabulous baker gave me this tip about using about 1/4th less butter than called for in most recipes to have a lighter frosting without that slick texture that this one had. Must try that next time.
Cake:
I used the easy sponge cake from here and added some instant coffee powder to the batter.
But this would be equally good with my all time favourite chocolate cake here
Or my absolute favourite cake ever in the whole world, this fluffy and cloud-like whipped cream cake.
Actually Swiss Meringue Butter cream will go on anything and it is definitely worth learning for its versatility and stability and satiny smooth, fluffy texture.
For moistening the cake layers before filling and frosting: Use simple sugar syrup, a combination of equal parts sugar and water heated until the sugar is dissolved to which flavorings like vanilla or in this cake- coffee liqueur and 1/4 tsp instant coffee powder were used and brush it over the two cake layers to moisten and flavour them. IF you like cake really moist, you can poke holes all over the cake with toothpicks and pour the syrup over the cake with a spoon.Tweet
8 Temmuz 2012 Pazar
Fresh Guacamole
To contact us Click HERE

When summertime draws near, I find myself craving light, citrusy and fruity flavors. This recipe for fresh guacamole hits all the right marks this time of year. It's great in everything from Fish Tacos (which will be my next post!) to simply served alongside your favorite tortilla chips.
Plus, avocados are packed with health benefits. Although avocados have a high fat content, it is mostly the healthy, monounsaturated fat. Avocados can also help you to maintain a healthy heart, lower your cholesterol levels, as well as help fight against cancer and inflammation. Check out these 15 Health Benefits of Avocados.
This particular recipe for Guacamole is my favorite way to make it. I love the bright splash of lime juice, paired with the creamy avocado and fresh cilantro. Juicy tomatoes are the perfect way to finish it off.
Bon Appetit!

Fresh Guacamole
Ingredients:2 Hass avocados, halved, pitted and peeledJuice of 1 lime2 tbsp. minced red onion2 tbsp. chopped cilantro1 tomato, dicedSalt & pepper, to tasteExtra Cilantro, for garnish
Directions:In a medium bowl, mash the avocados with a fork. Add the lime juice, red onion, cilantro and tomato. Stir well. Season with salt & pepper, to taste.
Press a piece of plastic wrap directly onto the surface of the guacamole until ready to use. (This will help prevent it from changing color). Garnish with a fresh sprig of cilantro.
Enjoy!

When summertime draws near, I find myself craving light, citrusy and fruity flavors. This recipe for fresh guacamole hits all the right marks this time of year. It's great in everything from Fish Tacos (which will be my next post!) to simply served alongside your favorite tortilla chips.
Plus, avocados are packed with health benefits. Although avocados have a high fat content, it is mostly the healthy, monounsaturated fat. Avocados can also help you to maintain a healthy heart, lower your cholesterol levels, as well as help fight against cancer and inflammation. Check out these 15 Health Benefits of Avocados.
This particular recipe for Guacamole is my favorite way to make it. I love the bright splash of lime juice, paired with the creamy avocado and fresh cilantro. Juicy tomatoes are the perfect way to finish it off.
Bon Appetit!
Fresh Guacamole
Ingredients:2 Hass avocados, halved, pitted and peeledJuice of 1 lime2 tbsp. minced red onion2 tbsp. chopped cilantro1 tomato, dicedSalt & pepper, to tasteExtra Cilantro, for garnish
Directions:In a medium bowl, mash the avocados with a fork. Add the lime juice, red onion, cilantro and tomato. Stir well. Season with salt & pepper, to taste.
Press a piece of plastic wrap directly onto the surface of the guacamole until ready to use. (This will help prevent it from changing color). Garnish with a fresh sprig of cilantro.
Enjoy!
Fish Tacos with Pan-Seared Mahi-Mahi
To contact us Click HERE


I recently saw a gorgeous photo of fish tacos that literally made my mouth water. Ever since, I've been craving them like something fierce! For the life of me, I can't remember where I saw that photo....I think it might have been a restaurant advertisement. I keep thinking I'll see the photo again, but not so far.
Plus, the May issue of Food Network Magazine ran a special section on tacos, with 50 Taco Recipes. Well, after seeing that original photo and seeing all the delicious taco options in FN mag, I've been on somewhat of a taco kick. Do you ever get on food kicks?
Well, fish tacos were at the very tip-top of my taco list, so I came up with the recipe below. I have to say that they came out quite scrumptious...Gorgeous to look at with an incredibly fresh and citrusy flavor. The creamy guacamole, paired with the fresh lime and cilantro in the pico de gallo results in a stellar combination.
Brad and I even made a special trip to our local fish market to pick out the perfect mahi-mahi filets. You don't necessarily have to use mahi-mahi. If you have another favorite, that's a-okay. You'll just want to use a thick cut of a fish that's not too flaky.
These have earned a spot on my top-rated recipes...You'll really LOVE these!
Bon Appetit, my friends!!


Fish Tacos with Pan-Seared Mahi-MahiIngredients:Fresh guacamole (recipe below)Fresh Pico de Gallo (recipe below)1 small head red cabbage, shredded2 tbsp vegetable oil3 tbsp fresh lime juice2 lbs. mahi mahi, cut crosswise into 1-inch strips
1 tbsp butter 1 tbsp extra virgin olive oil Salt & pepper, to taste Ten 7-inch tortillas, warmed
Directions:Prepare the fresh guacamole and pico de gallo according to the recipes below. Put both into the fridge until ready to use.
In a large bowl, toss the cabbage with the 2 tablespoons of vegetable oil and 2 tablespoons of the lime juice. Season with salt and pepper. Set to the side.
Add the butter and olive oil to a medium skillet and melt over medium heat. Season the strips of mahi mahi with salt and pepper, and add them to the skillet. Cook for approximately 8-10 minutes, or until the fish is cooked through, turning once. Drizzle the fish with the remaining 1 tbsp of lime juice. Once cooked, remove from the heat and put to the side.
To assemble the tacos:Spread about 1 tbsp of the guacamole on one half of a warmed tortilla. Top with several strips of mahi-mahi, along with a large spoonful of the cabbage slaw. Finish it off with a large spoonful of pico de gallo.
Serve with lime wedges.
Enjoy!

Fresh GuacamoleIngredients:2 Hass avocados, halved, pitted and peeledJuice of 1 lime2 tbsp. minced red onion2 tbsp. chopped cilantro1 tomato, dicedSalt & pepper, to tasteExtra Cilantro, for garnish Directions:In a medium bowl, mash the avocados with a fork. Add the lime juice, red onion, cilantro and tomato. Stir well. Season with salt & pepper, to taste.Press a piece of plastic wrap directly onto the surface of the guacamole until ready to use. (This will help prevent it from changing color). Garnish with a fresh sprig of cilantro.
Enjoy!

Pico de GalloIngredients:1 large tomato, diced into small pieces1/2 red onion, diced1/3 cup fresh cilantro, choppedFresh lime juice, to taste
Directions:Mix all ingredients. Stir well and chill in the fridge. Serve with your favorite tortilla chips!
I recently saw a gorgeous photo of fish tacos that literally made my mouth water. Ever since, I've been craving them like something fierce! For the life of me, I can't remember where I saw that photo....I think it might have been a restaurant advertisement. I keep thinking I'll see the photo again, but not so far.
Plus, the May issue of Food Network Magazine ran a special section on tacos, with 50 Taco Recipes. Well, after seeing that original photo and seeing all the delicious taco options in FN mag, I've been on somewhat of a taco kick. Do you ever get on food kicks?
Well, fish tacos were at the very tip-top of my taco list, so I came up with the recipe below. I have to say that they came out quite scrumptious...Gorgeous to look at with an incredibly fresh and citrusy flavor. The creamy guacamole, paired with the fresh lime and cilantro in the pico de gallo results in a stellar combination.
Brad and I even made a special trip to our local fish market to pick out the perfect mahi-mahi filets. You don't necessarily have to use mahi-mahi. If you have another favorite, that's a-okay. You'll just want to use a thick cut of a fish that's not too flaky.
These have earned a spot on my top-rated recipes...You'll really LOVE these!
Bon Appetit, my friends!!
Fish Tacos with Pan-Seared Mahi-MahiIngredients:Fresh guacamole (recipe below)Fresh Pico de Gallo (recipe below)1 small head red cabbage, shredded2 tbsp vegetable oil3 tbsp fresh lime juice2 lbs. mahi mahi, cut crosswise into 1-inch strips
1 tbsp butter 1 tbsp extra virgin olive oil Salt & pepper, to taste Ten 7-inch tortillas, warmed
Directions:Prepare the fresh guacamole and pico de gallo according to the recipes below. Put both into the fridge until ready to use.
In a large bowl, toss the cabbage with the 2 tablespoons of vegetable oil and 2 tablespoons of the lime juice. Season with salt and pepper. Set to the side.
Add the butter and olive oil to a medium skillet and melt over medium heat. Season the strips of mahi mahi with salt and pepper, and add them to the skillet. Cook for approximately 8-10 minutes, or until the fish is cooked through, turning once. Drizzle the fish with the remaining 1 tbsp of lime juice. Once cooked, remove from the heat and put to the side.
To assemble the tacos:Spread about 1 tbsp of the guacamole on one half of a warmed tortilla. Top with several strips of mahi-mahi, along with a large spoonful of the cabbage slaw. Finish it off with a large spoonful of pico de gallo.
Serve with lime wedges.
Enjoy!
Fresh GuacamoleIngredients:2 Hass avocados, halved, pitted and peeledJuice of 1 lime2 tbsp. minced red onion2 tbsp. chopped cilantro1 tomato, dicedSalt & pepper, to tasteExtra Cilantro, for garnish Directions:In a medium bowl, mash the avocados with a fork. Add the lime juice, red onion, cilantro and tomato. Stir well. Season with salt & pepper, to taste.Press a piece of plastic wrap directly onto the surface of the guacamole until ready to use. (This will help prevent it from changing color). Garnish with a fresh sprig of cilantro.
Enjoy!
Pico de GalloIngredients:1 large tomato, diced into small pieces1/2 red onion, diced1/3 cup fresh cilantro, choppedFresh lime juice, to taste
Directions:Mix all ingredients. Stir well and chill in the fridge. Serve with your favorite tortilla chips!
Lemon-Coconut Cake...Oh, Baby!
To contact us Click HERE

When it comes to mother-in-laws, I consider myself incredibly lucky. Brad's mom, Carol, is a pretty fantastic woman. She is the sweetest, most caring person, and I feel so lucky to have her in my life. In fact, we don't like the term "in-law" around here...She's Mom 2. :-)
Every year on her birthday, she gives me a "birthday cake challenge." See, she comes up with an interesting flavor combination, and lets me run with the idea. This year, she wanted a layer cake with both coconut and lemon flavors. I immediately pictured a scrumptious coconut cake with homemade lemon curd between the layers.
With that idea in mind, I got to work trying to find the perfect recipe and found just what I was looking for over at joyofbaking.com. This is a spectacular recipe, which incorporates buttermilk in the cake batter. This lends a perfect crumb and texture to the cake, which turns out moist and delicious.
The lemon curd comes together fairly quickly with the help of a double boiler, and adds a fresh, citrusy note to the cake.
Here are Mom 2's Past Birthday Cake Challenges:
Last year, she requested a cake flavored with fresh orange, coconut and pecan, so I came up with THIS CREATION, which was delish!
In 2010, she challenged me with a chocolate cake that had a coconut-cream cheese icing. This Dreamy Coconut-Chocolate Cake with Coconuty Cream Cheese Icing was the fabulous result.
In 2009, the challenge was a cake inspired by a Mounds bar...something with chocolate and coconut. My creation? An incredibly decadent coconut cake, with actual melted Mounds bars as the filling between the cake layers. This Mounds Bar Cake, my friends, is probably one of my personal favorites!
You may remember this Chocolate Kahlua Cake from back in 2008. It was delicious, too!!
I wish that I had more photos of this year's Lemon-Coconut Cake. However, it was so delicious, that the tiny little piece in these photos was the only piece left for me to shoot. I guess that's a good thing?
I wonder what next year's challenge will be. Stay tuned!
Bon Appetit, my friends! Lemon-Coconut CakeMakes one - 9 inch(23 cm) layer cake.Source: joyofbaking.comOriginally Adapted From: Foster, Sara. 'TheFoster's Market Cookbook'. Random House. New York: 2002.
Ingredients:Lemon Curd:3 large eggs 1/3 cup (80 ml) fresh lemon juice (2-3 lemons) (do not use the bottled lemon juice) 1 tablespoon (4 grams) finely shredded lemon zest (outer yellow skin of lemon)3/4 cup (150 grams) granulated white sugar 4 tablespoons (56 grams) unsalted butter, at room temperature and cut into small pieces
Coconut Cake Recipe:
6 large eggs
2 1/2 cups (325 grams) all purpose flour
2 tsp baking powder
1/2 tsp baking soda
1/2 tsp salt
3/4 cup (170 grams) unsalted butter, room temperature
1 3/4 cups (350 grams) granulated white sugar, divided
1 tsp coconut extract
1 3/4 cups (420 ml) buttermilk
1/2 tsp cream of tartar
Frosting:2 large (60 grams) egg whites1 1/2 cups (300 grams) granulated white sugar1/4 cup (60 ml) cold water1 tablespoon light corn syrup1 teaspoon pure vanilla extract
Garnish:2 cups (150 grams) sweetened shredded or flaked coconut (can use unsweetened dried coconut)
Directions:Lemon Curd:
In a stainless steel bowl placed over asaucepan of simmering water, whisk together the eggs, sugar, and lemon juiceuntil blended. Cook, stirring constantly (to prevent it fromcurdling), until the mixture becomes thick (like sour cream or a hollandaise sauce)(160 degrees F or 71 degrees C). This will take approximately 10 minutes. Remove fromheat and immediately pour through a fine strainer to remove any lumps.
Cut the butterinto small pieces and whisk into the mixture until the butter has melted. Add thelemon zest and let cool. The lemon curd will continue to thicken as it cools. Cover immediately (so a skin doesn't form) and refrigerate until cold. Thelemon curd can be made several days (up to a week) in advance.
Preheat oven to 350 degrees F (177 degrees C). Butterand flour two - 9 inch x 1 1/2 inch (23 x 3.75 cm) cake pans, and then line the bottoms with parchment paper (or spray with BakersJoy).
CoconutCake:
While the eggs are still cold separate the eggs, placing the yolks inone bowl and the whites in another bowl. Cover the two bowls with plasticwrap and allow the eggs to come to room temperature before using (about 30minutes).
In a mixing bowl siftor whisk together the flour, baking powder, baking soda, and salt.
In bowl of electricmixer, or with a hand mixer, beat the butter until soft (about 1-2 minutes). Gradually add 1 1/2 cups (300grams) of the sugarand beat until light and fluffy (about 2-3 minutes). Add the egg yolks, one at atime, beating well after each addition. Scrape down the sides of the bowl.Add the vanilla extract and beat until combined.
With the mixer on lowspeed, alternately add the flour mixture and buttermilk, in three additions, beginningand ending with the flour.
In a clean bowl of yourelectric mixer, with the whisk attachment, (or with a hand mixer) beat the egg whites until foamy.Add the cream of tartar and continue beating until soft peaks form. Gradually add the remaining 1/4 cup (50 grams) of sugar and continue to beatuntil stiff peaks form. Witha rubber spatula gently fold alittle of the whites into the batter to lighten it, and thenfold in the remainingwhites until combined. Do not over mix the batter or it will deflate.
Divide thebatter and pour into the prepared pans, smoothing the surface with an offsetspatula or the back of a spoon. Bake for about 35 to 40 minutes or until atoothpick inserted into the center of the cake comes out clean and the cakesprings back when pressed lightly in center. Place thecakes on a wire rack to cool, in their pans, for about 10 minutes. Then invertthe cakes onto a greased rack. To prevent splitting, reinvert cakes sothat tops are right side up. Cool completely before filling and frosting.
Frosting:
In a stainless steel bowl over a saucepan of simmering water, place the eggwhites, sugar, water, and corn syrup. With a handheld electric mixer beatthe mixture for 3 to 4 minutes on low speed. Increase the speed to highand continue to beat for another 3 to 4 minutes or until the icing is shiny andsatiny with soft peaks.
Remove from heat,add the vanilla extract, and continue to beat on high speed for another 1 to 2minutes or until the frosting is thick. Use immediately.
To Assemble:
With a serrated knife, cut each cake layer in half, horizontally. Place one cake layer on your serving plate and spread with about1/3 of the lemon curd and sprinkle with about 2 tablespoons of coconut. Continue with the nextlayers, stacking and filling with the lemon curd and coconut. Frost thetop and sides of the cake with the 7-Minute Frosting and then sprinkle withabout 1 cup of coconut. Cover and refrigerate the cakeuntil serving time.

When it comes to mother-in-laws, I consider myself incredibly lucky. Brad's mom, Carol, is a pretty fantastic woman. She is the sweetest, most caring person, and I feel so lucky to have her in my life. In fact, we don't like the term "in-law" around here...She's Mom 2. :-)
Every year on her birthday, she gives me a "birthday cake challenge." See, she comes up with an interesting flavor combination, and lets me run with the idea. This year, she wanted a layer cake with both coconut and lemon flavors. I immediately pictured a scrumptious coconut cake with homemade lemon curd between the layers.
With that idea in mind, I got to work trying to find the perfect recipe and found just what I was looking for over at joyofbaking.com. This is a spectacular recipe, which incorporates buttermilk in the cake batter. This lends a perfect crumb and texture to the cake, which turns out moist and delicious.
The lemon curd comes together fairly quickly with the help of a double boiler, and adds a fresh, citrusy note to the cake.
Here are Mom 2's Past Birthday Cake Challenges:
Last year, she requested a cake flavored with fresh orange, coconut and pecan, so I came up with THIS CREATION, which was delish!
In 2010, she challenged me with a chocolate cake that had a coconut-cream cheese icing. This Dreamy Coconut-Chocolate Cake with Coconuty Cream Cheese Icing was the fabulous result.
In 2009, the challenge was a cake inspired by a Mounds bar...something with chocolate and coconut. My creation? An incredibly decadent coconut cake, with actual melted Mounds bars as the filling between the cake layers. This Mounds Bar Cake, my friends, is probably one of my personal favorites!
You may remember this Chocolate Kahlua Cake from back in 2008. It was delicious, too!!
I wish that I had more photos of this year's Lemon-Coconut Cake. However, it was so delicious, that the tiny little piece in these photos was the only piece left for me to shoot. I guess that's a good thing?
I wonder what next year's challenge will be. Stay tuned!
Bon Appetit, my friends!
Lemon-Coconut CakeMakes one - 9 inch(23 cm) layer cake.Source: joyofbaking.comOriginally Adapted From: Foster, Sara. 'TheFoster's Market Cookbook'. Random House. New York: 2002.Ingredients:Lemon Curd:3 large eggs 1/3 cup (80 ml) fresh lemon juice (2-3 lemons) (do not use the bottled lemon juice) 1 tablespoon (4 grams) finely shredded lemon zest (outer yellow skin of lemon)3/4 cup (150 grams) granulated white sugar 4 tablespoons (56 grams) unsalted butter, at room temperature and cut into small pieces
Coconut Cake Recipe:
6 large eggs
2 1/2 cups (325 grams) all purpose flour
2 tsp baking powder
1/2 tsp baking soda
1/2 tsp salt
3/4 cup (170 grams) unsalted butter, room temperature
1 3/4 cups (350 grams) granulated white sugar, divided
1 tsp coconut extract
1 3/4 cups (420 ml) buttermilk
1/2 tsp cream of tartar
Frosting:2 large (60 grams) egg whites1 1/2 cups (300 grams) granulated white sugar1/4 cup (60 ml) cold water1 tablespoon light corn syrup1 teaspoon pure vanilla extract
Garnish:2 cups (150 grams) sweetened shredded or flaked coconut (can use unsweetened dried coconut)
Directions:Lemon Curd:
In a stainless steel bowl placed over asaucepan of simmering water, whisk together the eggs, sugar, and lemon juiceuntil blended. Cook, stirring constantly (to prevent it fromcurdling), until the mixture becomes thick (like sour cream or a hollandaise sauce)(160 degrees F or 71 degrees C). This will take approximately 10 minutes. Remove fromheat and immediately pour through a fine strainer to remove any lumps.
Cut the butterinto small pieces and whisk into the mixture until the butter has melted. Add thelemon zest and let cool. The lemon curd will continue to thicken as it cools. Cover immediately (so a skin doesn't form) and refrigerate until cold. Thelemon curd can be made several days (up to a week) in advance.
Preheat oven to 350 degrees F (177 degrees C). Butterand flour two - 9 inch x 1 1/2 inch (23 x 3.75 cm) cake pans, and then line the bottoms with parchment paper (or spray with BakersJoy).
CoconutCake:
While the eggs are still cold separate the eggs, placing the yolks inone bowl and the whites in another bowl. Cover the two bowls with plasticwrap and allow the eggs to come to room temperature before using (about 30minutes).
In a mixing bowl siftor whisk together the flour, baking powder, baking soda, and salt.
In bowl of electricmixer, or with a hand mixer, beat the butter until soft (about 1-2 minutes). Gradually add 1 1/2 cups (300grams) of the sugarand beat until light and fluffy (about 2-3 minutes). Add the egg yolks, one at atime, beating well after each addition. Scrape down the sides of the bowl.Add the vanilla extract and beat until combined.
With the mixer on lowspeed, alternately add the flour mixture and buttermilk, in three additions, beginningand ending with the flour.
In a clean bowl of yourelectric mixer, with the whisk attachment, (or with a hand mixer) beat the egg whites until foamy.Add the cream of tartar and continue beating until soft peaks form. Gradually add the remaining 1/4 cup (50 grams) of sugar and continue to beatuntil stiff peaks form. Witha rubber spatula gently fold alittle of the whites into the batter to lighten it, and thenfold in the remainingwhites until combined. Do not over mix the batter or it will deflate.
Divide thebatter and pour into the prepared pans, smoothing the surface with an offsetspatula or the back of a spoon. Bake for about 35 to 40 minutes or until atoothpick inserted into the center of the cake comes out clean and the cakesprings back when pressed lightly in center. Place thecakes on a wire rack to cool, in their pans, for about 10 minutes. Then invertthe cakes onto a greased rack. To prevent splitting, reinvert cakes sothat tops are right side up. Cool completely before filling and frosting.
Frosting:
In a stainless steel bowl over a saucepan of simmering water, place the eggwhites, sugar, water, and corn syrup. With a handheld electric mixer beatthe mixture for 3 to 4 minutes on low speed. Increase the speed to highand continue to beat for another 3 to 4 minutes or until the icing is shiny andsatiny with soft peaks.
Remove from heat,add the vanilla extract, and continue to beat on high speed for another 1 to 2minutes or until the frosting is thick. Use immediately.
To Assemble:
With a serrated knife, cut each cake layer in half, horizontally. Place one cake layer on your serving plate and spread with about1/3 of the lemon curd and sprinkle with about 2 tablespoons of coconut. Continue with the nextlayers, stacking and filling with the lemon curd and coconut. Frost thetop and sides of the cake with the 7-Minute Frosting and then sprinkle withabout 1 cup of coconut. Cover and refrigerate the cakeuntil serving time.
BLT Salad with Arugula, Feta and Balsamic Vinaigrette
To contact us Click HERE

On a recent trip to the farmer's market, we luckily got there early enough to pick up some beautiful handfuls of crisp, peppery arugula from Jones Valley Urban Farm, which is an awesome "teaching farm" here in Birmingham, AL. There, they teach folks about the value of agriculture and the benefits of eating fresh, healthy ingredients. It's awesome because they've transformed over 3 acres of vacant downtown property into a lush garden. Pretty cool, huh?
Now, this particular arugula wasn't just peppery, it was flat-out spicy. I topped it with thick-cut bacon, fresh cherry tomatoes, crumbled feta cheese, and a quick and simple homemade balsamic vinaigrette. It was the perfect light lunch after a morning at the market.
A few slices of whole wheat bread on the side would make a great accompaniment to this easy-peasy salad.
Bon Appetit, my friends!

BLT Salad with Arugula, Feta & Balsamic Vinaigrette
Ingredients:Salad:6 slices thick-cut bacon4 cups baby arugula 1 pint cherry or grape tomatoes1/2 cup feta cheese, crumbled
Vinaigrette:1/4 cup balsamic vinegar3/4 cup extra virgin olive oil1/2 tsp salt1/2 tsp freshly ground black pepper
Directions:Heat a large skillet over medium heat. Add the bacon and fry until crisp, turning often, about 5 minutes per slice. Transfer to a wire rack or to a plate lined with paper towels and drain.
Meanwhile, make the vinaigrette - Place the balsamic vinegar, olive oil, salt and pepper in an air tight container. Shake to thoroughly combine.
Once the bacon has cooled, chop or tear into small pieces.
Toss the arugula in a large bowl, along with the tomatoes, bacon and desired amount of balsamic vinaigrette, reserving the remaining vinaigrette for later use. Sprinkle the feta cheese over the top.
Enjoy!

On a recent trip to the farmer's market, we luckily got there early enough to pick up some beautiful handfuls of crisp, peppery arugula from Jones Valley Urban Farm, which is an awesome "teaching farm" here in Birmingham, AL. There, they teach folks about the value of agriculture and the benefits of eating fresh, healthy ingredients. It's awesome because they've transformed over 3 acres of vacant downtown property into a lush garden. Pretty cool, huh?
Now, this particular arugula wasn't just peppery, it was flat-out spicy. I topped it with thick-cut bacon, fresh cherry tomatoes, crumbled feta cheese, and a quick and simple homemade balsamic vinaigrette. It was the perfect light lunch after a morning at the market.
A few slices of whole wheat bread on the side would make a great accompaniment to this easy-peasy salad.
Bon Appetit, my friends!
BLT Salad with Arugula, Feta & Balsamic Vinaigrette
Ingredients:Salad:6 slices thick-cut bacon4 cups baby arugula 1 pint cherry or grape tomatoes1/2 cup feta cheese, crumbled
Vinaigrette:1/4 cup balsamic vinegar3/4 cup extra virgin olive oil1/2 tsp salt1/2 tsp freshly ground black pepper
Directions:Heat a large skillet over medium heat. Add the bacon and fry until crisp, turning often, about 5 minutes per slice. Transfer to a wire rack or to a plate lined with paper towels and drain.
Meanwhile, make the vinaigrette - Place the balsamic vinegar, olive oil, salt and pepper in an air tight container. Shake to thoroughly combine.
Once the bacon has cooled, chop or tear into small pieces.
Toss the arugula in a large bowl, along with the tomatoes, bacon and desired amount of balsamic vinaigrette, reserving the remaining vinaigrette for later use. Sprinkle the feta cheese over the top.
Enjoy!
Bubba's Peach Cobbler Pie...Fit for a Wedding!
To contact us Click HERE


The best food has the ability to tell a story, bring people together, feed our souls, and maybe most importantly, it can be the source of memories that put a smile on our face for years and years. Food that's accompanied by a cherished story or memory is the best kind, don't you think? And this special recipe for a beloved peach pie is one such story.
The story begins with a friend of mine from high school - Jana. Jana recently shared this family recipe with me, along with a story about her grandfather, Jim Champion (aka "Bubba"). At the peak of peach season every year, Bubba would travel to his mountain house near Helen, GA where he would make lots and lots of these peach pies. He would then freeze the precious collection of delicious pies and save them to eat throughout the year, simply pulling them out of the freezer when their lucky friends or family would visit.
This idea alone is enough to make me want to run out and buy a deep freezer to fill with pies! :)
But the story doesn't stop there...This past weekend, Jana's brother got married and he wanted these peach pies instead of the traditional groom's cake. So, Jana made peach pies for the wedding, using this recipe. And don't you know it...They totally stole the spotlight from the bride's wedding cake!
I'm not surprised at all, because this is indeed no ordinary peach pie. It's filled with plenty of love and fresh, glorious peaches. The filling that's spread over the peaches almost gives the pie a cobbler feel. It's hard to explain, but easy to fall in love with!
We topped it off with homemade vanilla bean ice cream (which will be posted soon!). I also used one of my favorite homemade pie crust recipes, which is by Melissa d'Arabian and is posted below. It was nothing short of perfect peachiness on a plate!
Jana - Thank you so much for graciously sharing this family treasure of a recipe! It quickly became a new favorite of mine, too.
Bon Appetit, my friends!
Bubba's Peach PieSource: Jana's Grandfather - Jim Champion (aka "Bubba")
Ingredients:2 unbaked pie crusts, store-bought or homemade (see recipe below)
2 -3 cups fresh peaches, peeled and sliced into wedges
1 cup sugar (or 3/4 cup if peaches are extra sweet)
1/3 cup butter or margarine 1/3 cup flour
1 egg
1/2 tsp. vanilla
Directions:Preheat oven to 300 degrees F.
In the bowl of a stand mixer, cream together sugar and butter until fluffy. Next, add flour, egg and vanilla. Mix together well.
Place 1 pie crust in the bottom of a greased pie plate, and arrange sliced peaches in the pie shell. Spread the filling over peaches in an even layer.
Next, create a lattice crust on the top using the second pie crust. Not sure how? Here's a helpful link from Bonappetit.com:
How to Make a Lattice Crust
Place the pie plate on a large cookie sheet and place it on the middle rack in the preheated oven. Bake at 300 for 1 hour.
Serve warm with vanilla ice cream.
Enjoy!
Basic Pie Crust:Source: Ten Dollar Dinners with Melissa d'ArabianYield: 2 (9-inch) pie crusts
Ingredients:1 cup butter (2 sticks), cubed and chilled
2 1/4 cups all-purpose flour
1 teaspoon salt
8 to 10 tablespoons ice water
Directions:Put the butter, flour, and salt in the food processor, and pulse lightly just until the mixture resembles wet sand. Add the water, 1 tablespoon at a time, pulsing briefly after each spoonful of water. Keep adding water until the dough just begins to gather into larger clumps.
Transfer equal amounts of the dough into 2 resealable plastic bags and pat each into a disk. Let rest in the refrigerator for at least 30 minutes. Remove 1 of the disks from the bag to a flour coated surface. Using a rolling pin, roll the dough out to a 10-inch round. Gently fit the rolled dough into a 9-inch pie pan, and refrigerate while you prepare the pie ingredients.

The best food has the ability to tell a story, bring people together, feed our souls, and maybe most importantly, it can be the source of memories that put a smile on our face for years and years. Food that's accompanied by a cherished story or memory is the best kind, don't you think? And this special recipe for a beloved peach pie is one such story.
The story begins with a friend of mine from high school - Jana. Jana recently shared this family recipe with me, along with a story about her grandfather, Jim Champion (aka "Bubba"). At the peak of peach season every year, Bubba would travel to his mountain house near Helen, GA where he would make lots and lots of these peach pies. He would then freeze the precious collection of delicious pies and save them to eat throughout the year, simply pulling them out of the freezer when their lucky friends or family would visit.
This idea alone is enough to make me want to run out and buy a deep freezer to fill with pies! :)
But the story doesn't stop there...This past weekend, Jana's brother got married and he wanted these peach pies instead of the traditional groom's cake. So, Jana made peach pies for the wedding, using this recipe. And don't you know it...They totally stole the spotlight from the bride's wedding cake!
I'm not surprised at all, because this is indeed no ordinary peach pie. It's filled with plenty of love and fresh, glorious peaches. The filling that's spread over the peaches almost gives the pie a cobbler feel. It's hard to explain, but easy to fall in love with!
We topped it off with homemade vanilla bean ice cream (which will be posted soon!). I also used one of my favorite homemade pie crust recipes, which is by Melissa d'Arabian and is posted below. It was nothing short of perfect peachiness on a plate!
Jana - Thank you so much for graciously sharing this family treasure of a recipe! It quickly became a new favorite of mine, too.
Bon Appetit, my friends!
 |
| Yes, please! |
 |
| Freshly sliced peaches added to the pie shell |
 |
| Next, the filling is spread over the top |
 | |||
| And a pretty lattice crust finishes it all off. |
Bubba's Peach PieSource: Jana's Grandfather - Jim Champion (aka "Bubba")
Ingredients:2 unbaked pie crusts, store-bought or homemade (see recipe below)
2 -3 cups fresh peaches, peeled and sliced into wedges
1 cup sugar (or 3/4 cup if peaches are extra sweet)
1/3 cup butter or margarine 1/3 cup flour
1 egg
1/2 tsp. vanilla
Directions:Preheat oven to 300 degrees F.
In the bowl of a stand mixer, cream together sugar and butter until fluffy. Next, add flour, egg and vanilla. Mix together well.
Place 1 pie crust in the bottom of a greased pie plate, and arrange sliced peaches in the pie shell. Spread the filling over peaches in an even layer.
Next, create a lattice crust on the top using the second pie crust. Not sure how? Here's a helpful link from Bonappetit.com:
How to Make a Lattice Crust
Place the pie plate on a large cookie sheet and place it on the middle rack in the preheated oven. Bake at 300 for 1 hour.
Serve warm with vanilla ice cream.
Enjoy!
Basic Pie Crust:Source: Ten Dollar Dinners with Melissa d'ArabianYield: 2 (9-inch) pie crusts
Ingredients:1 cup butter (2 sticks), cubed and chilled
2 1/4 cups all-purpose flour
1 teaspoon salt
8 to 10 tablespoons ice water
Directions:Put the butter, flour, and salt in the food processor, and pulse lightly just until the mixture resembles wet sand. Add the water, 1 tablespoon at a time, pulsing briefly after each spoonful of water. Keep adding water until the dough just begins to gather into larger clumps.
Transfer equal amounts of the dough into 2 resealable plastic bags and pat each into a disk. Let rest in the refrigerator for at least 30 minutes. Remove 1 of the disks from the bag to a flour coated surface. Using a rolling pin, roll the dough out to a 10-inch round. Gently fit the rolled dough into a 9-inch pie pan, and refrigerate while you prepare the pie ingredients.
Kaydol:
Kayıtlar (Atom)